 |
| Starter that I used. a M3T from a Mitsubishi engine |
Today I did the workbook on starter motors which involved disassembling a starter motor and checking parts of it, by completing various tests
Starter Motor Disassembly
- First removed the "M" terminal wire from the solenoid. It is removed by undoing a nut and it then lifts of solenoid.
- Then removed the bolts in the top of the starter motor, or communicator end housing, with 12mm spanner.
- Removed communicator housing, then removed brushes and brush plate.
- Removed field coil housing, which is the main body of the starter. (the middle section).
- Removed shift fork then removed the armature assembly.
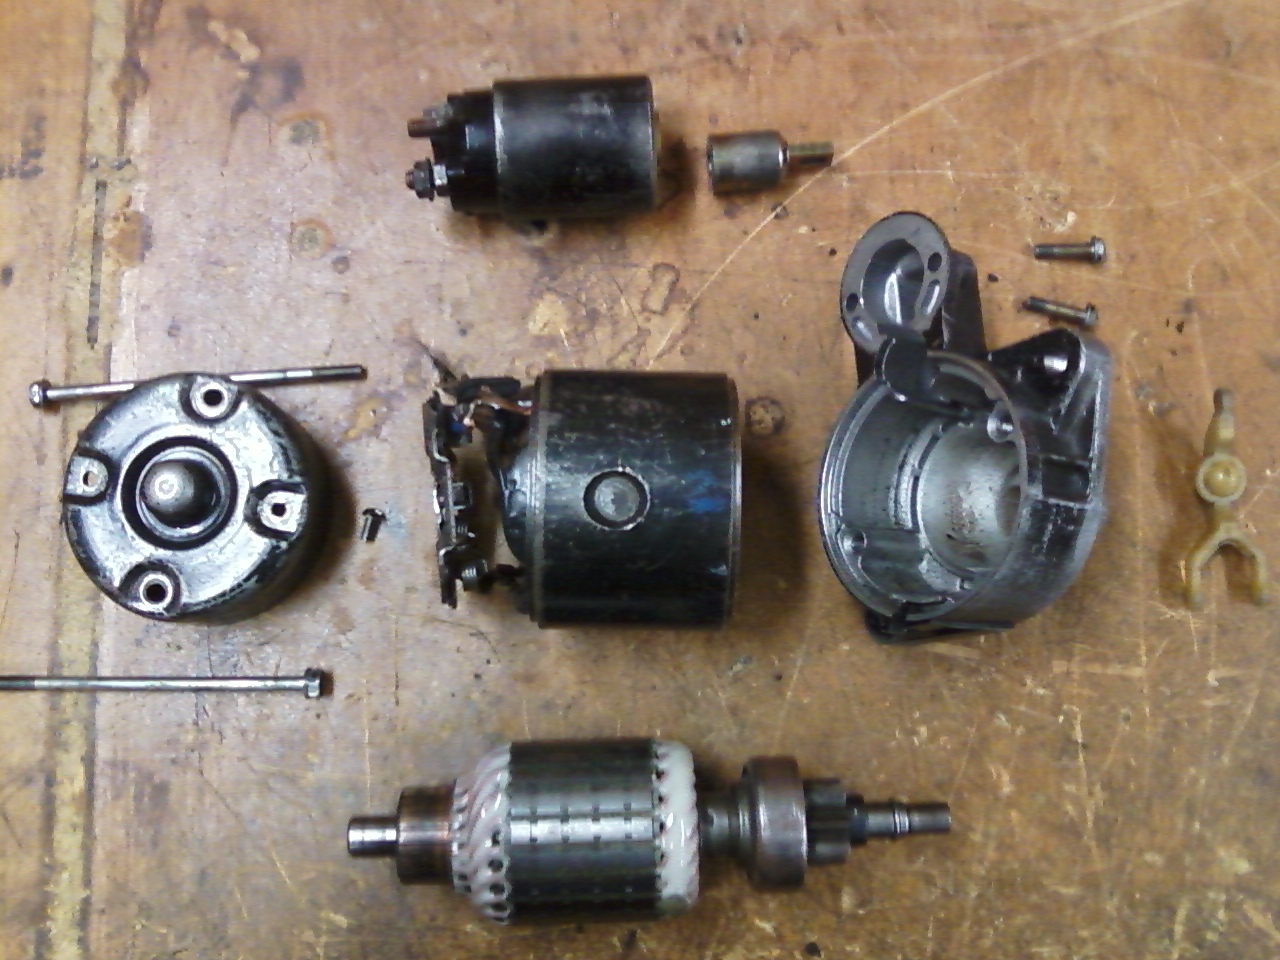 |
| Fully Disassembled Starter Motor,
Going clockwise: Solenoid and Plunger, Drive End Housing, Shift Fork, Armature and Clutch, Communicator End Housing and bolts, in the Centre; Field Coil Housing
|
Testing Performed
After I had disassembled the starter motor I began performing the tests required.
The first test was a visual inspection of the armature and from the inspection I found that it was in good condition and no repairs were necessary. As there was no overheating, burning, physical damage or poling.
The second test was the ground circuit test which tested for short circuiting of the communicator segments, to the armature shaft. This required the use of multimeter on the Ω setting and putting the positive probe (red) on the communicator segments and the Negative probe (black) on the shaft or core of armature if not earthing I would get a reading of "OL" on my multimeter which is what I got, so it was in good order.
The third test was a continuity circuit test which required use of the multimeter again on Ω setting, but probes were placed on the communicator segments with black lead on one segment and red lead on another, then moving the red lead to each segment. When checked results were in range which was less than 1Ω so this was also okay.
Testing Alternatives
the first alternative too the previous tests required use of a communicator tester that uses a light to show continuity (below)
 |
| Continuity tester alternative to using multimeter |
To use this required you to put the leads of the tester, onto the segments of the comunicator. One lead was put onto the main core of the armature (black) and the other was put onto the segments (red) when there was continuity the tester light remained on like in picture above.
For the ground test all that was needed to do was turn of switch and test again making sure the light does not glow. The tested armature passed these tests.
The second alternative was the use of the growler tester
 |
| Growler tester and armature tested |
This was used to check for short circuiting of the armature. The growler creates a electro-magnet that produces the magnetic field of the armature. Then a hacksaw blade was used to detect if there was any variations in the field by being held above the armature and then vibrating if a winding of the armature is malfunctioning and shorting. Tested armature was in good condition here as well.
 |
| Both testing machines that were used. Growler to right and Continuity tester in middle and left |
Field Coil Testing
The field coil also required testing this was done with the multimeter on the Ω setting and checking for continuity and grounding.
Testing for continuity required me to put the negative lead on the earth and the positive lead on a brush. This showed a reading of 0.00Ω which was okay for the starter I tested, as required was 0 - 0.05Ω
Testing for grounding required putting the positive multimeter lead on the M terminal wire and the negative lead onto the housing. When I tested this I got a reading of 8.5MΩ which was incorrect for the field coil. This meant that the current was earthing before it should. The reading should have been OL this meant that a wire in the field housing was broken and the starter or the field coil housing need replacing. But it was not a serious problem as starter still functioned.
Solenoid Testing
The final tests required were of the solenoid. This required use of a 9V power source and wires connected to the B and S terminal of the solenoid
 |
| Solenoid Terminals |
The second solenoid test was the hold in test this test shows if the plunger is remaining in when the power source is connected to ignition terminal M and a negative wire to the solenoid body. When the power source is disconnected plunger should release. This was okay also.
Final Test
This test was done after I reassembled the starter this was assembled by going in reverse order to disassembly.
After It was reassembled I completed the no load test which required connecting starter to a 12V battery and running it and recording the current flow. To do this the starter is held in place with a special vice and 2 wires were connected between the battery supply terminal (B) and a second cable to negative battery terminal. Then a 3rd wire connected from the M terminal to S terminal to run starter.
 |
| Starter connected to Battery |
Once it was running I used a clamp meter, set to 200A and connected it around the positive lead from the battery and got a reading of 58.2A at 11V. This is the amount of current being drawn from the battery to power the starter motor. This was above manufactures specifications which was 30A - 50A Indicating starter was worn.
Testing completed.
Testing completed.
No comments:
Post a Comment